Flowered cupcake

Sunday, August 19, 2012
S'mores Fortress
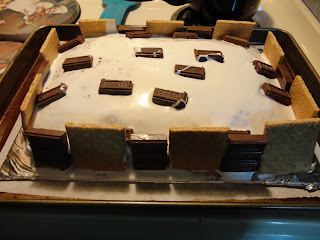
Yes folks, I call this the s'mores fortress. It really couldn't be anything else.
Here's the story (of a lovely lady...): My son's birthday is in February. I hate it. Mine is in January so I have grown up knowing how much winter birthdays just suck. We can't do outdoor stuff and our house is not all that big, so I am stuck paying for a venue that will inevitably get snowed out and be a total waste that leaves my son with very few guests to play with and awkward exchanges between the parents (because the ones that show don't actually know each other). What I really want to do for a party is have a cookout, give the kids balls, Frisbees and various water weaponry and let them go nuts outside. Maybe lay out butcher paper and a bunch of art supplies. While the parents police the kids and sip adult beverages. Ahh, fun times...
Enter the Half Birthday Party! We tossed around this idea last year but never did it, so this year we went for it. We had a water balloon war party for Shaunie. We served hot dogs made it BYOB and no presents were exchanged. Just fun. The party was a day after National S'mores Day and I had been craving all things marshmallow lately so I figured what better at a cookout? S'mores cake!
And they all went nuts!
I looked up several variations on the s'mores cake and pretty much compiled my research based on my favorite. The one thing I found odd in all the cakes I looked up was that they all used yellow cake. What? It's s'mores, guys! Where's the chocolate love? So here's the rundown of what I did:
1. Whipped up a chocolate boxed cake mix and baked it in my 9x13 pan. Really this would work in layers too, but I wasn't getting too fancy, I just wanted some dang s'mores!
2. Crushed 1 package of graham crackers in a processor and added margarine. How much you ask? Well, I have no idea. I put some in a pot and melted it then added it to the crumbs. It was just enough to moisten the crumbs and make them pressable. Then I spread them on the cake board and pressed them in what I estimated to be the right size. You can use more if you want more graham crackerey goodness!
3. I placed the cake on top of the crust. Then came the frosting. Oh the friggin frosting. I used a recipe I found online. Somehow it came out REALLY runny. So runny I couldn't thicken it even a little. I was going to add more powdered sugar but it was already so sweet and the marshmallow flavor was already fading as it was so that was out of the question. I tweaked things a bit and ended up with a passable icing, but I still wasn't really happy with it. The recipe I ended up with is posted at the end of this, though honestly I'm not sure I'm in love with the idea of recommending it...
Anyway, I poured the icing over the cake and stuck graham crackers and chocolate bars to the sides once it dribbled down a bit, this actually helped it to not drip as much... Then I put a few chocolate bar pieces on top of the cake.
4. Not done yet. I got out some large marshmallows. Ate one. Then I took out a handful, cut them in half and arranged them on a parchment paper-lined cookie sheet. I popped them in the oven on broil. ***Now this part is really important*** a few minutes is all it takes to toast these guys and still have them a little fluffy. So once they look done leave them in a minute or two longer. Take them out and let them cool a minute. Now you eat these. They are YUMMY. Now do that again but cook them the right amount of time. Pull them up however you need to and toss them on the cake as you like. Add a few more chocolate pieces too.
If you feel the need to add more sweetness (If you can take it) Go ahead and dribble some Hershey's syrup on it. Better yet make your own. Keep extra crackers on hand to stick on each plate.
And yes, it was as good as it looked!
The icing I made:
1 7oz jar marshmallow cream
1 tsp vanilla extract
1 cup powdered sugar
half & half or milk
Cream together the marshmallow and vanilla. Add sugar a little at a time. If it is thick add a little half & half. And I mean a little. Just enough, Then mix it up to see if you need more. Get it to the consistency you like and enjoy!
Subscribe to:
Post Comments (Atom)


No comments:
Post a Comment